Tuesday, 23 April 2013

Services you may not need in Windows 7

Services you may not need in Windows 7

Takeaway: If you evaluate your organization’s need for certain Windows 7 services, you may find that a number of them can be safely disabled.
Every version of Windows has shipped with a core set of system services that must run so that the system can perform basic operations. However, your organization may not necessarily need to have all the services running, and disabling unnecessary services can enhance performance and security. I put together a list of 13 services you can disable on your Windows 7 systems that will probably not negatively affect your business operations at all.
I say “probably” for a reason. Before you take drastic action, such as disabling a service on every PC in your organization, make sure that the service you’re disabling is not actually in use. This article makes a couple of broad assumptions: that your company doesn’t need to share Windows Media files and doesn’t use Windows 7’s HomeGroup features.
This is not a definitive list of services that can be disabled; these are just some obvious ones. Read carefully and make sure you test changes before deploying them across your organization.

1: IP Helper

Windows description: Provides tunnel connectivity using IPv6 transition technologies (6to4, ISATAP, Port Proxy, and Teredo) and IP-HTTPS. If this service is stopped, the computer will not have the enhanced connectivity benefits that these technologies offer.
Why this can be disabled: Many organizations haven’t even started testing IPv6, much less fully deployed it. As indicated in the service description, the IP Helper service is leveraged in IPv4-to-IPv6 transitions.

2: Offline Files

Windows description: The Offline Files service performs maintenance activities on the Offline Files cache, responds to user logon and logoff events, implements the internals of the public API, and dispatches interesting events to those interested in Offline Files activities and changes in cache state.
Why this can be disabled: If your organization doesn’t use the Offline Files feature found in both Windows client and server products, this service can be safely disabled. Obviously, if you are synchronizing files across the network, you shouldn’t disable this service.

3: Network Access Protection Agent

Windows description: The Network Access Protection (NAP) agent service collects and manages health information for client computers on a network. Information collected by the NAP agent is used to make sure that the client computer has the required software and settings. If a client computer is not compliant with health policy, it can be provided with restricted network access until its configuration is updated. Depending on the configuration of health policy, client computers might be automatically updated so that users quickly regain full network access without having to manually update their computer.
Why this can be disabled: If you’re not doing network-based remediation or if you’re doing remediation with a third-party tool that doesn’t leverage the NAP client, this service can be disabled.

4: Parental Controls

Windows description: This service is a stub for Windows Parental Control functionality that existed in Vista. It is provided for backward compatibility only.
Why this can be disabled: Corporate networks rarely used Vista’s Parental Control functionality. Further, this is a legacy service from Windows Vista.

5: Smart Card

Windows description: Manages access to smart cards read by this computer. If this service is stopped, this computer will be unable to read smart cards. If this service is disabled, any services that explicitly depend on it will fail to start.
Why this can be disabled: If your organization does not use smart cards for authentication purposes, you can safely disable this service.

6: Smart Card Removal Policy

Windows description: Allows the system to be configured to lock the user desktop upon smart card removal.
Why this can be disabled: If your organization does not use smart cards for authentication purposes, you can safely disable this service.

7: Windows Media Center Receiver Service

Windows description: Windows Media Center Service for TV and FM broadcast reception.
Why this can be disabled: In most corporate environments, TV and FM broadcast reception on desktop computers is not considered a “business critical” item that needs support, and it’s often not allowed anyway. You can disable this service to save some resources.

8: Windows Media Center Scheduler Service

Windows description: Starts and stops recording of TV programs within Windows Media Center.
Why this can be disabled: Likewise, there’s no need to record TV programs in a corporate environment.

9: Windows Media Player Network Sharing Service

Windows description: Shares Windows Media Player libraries to other networked players and media devices using Universal Plug and Play.
Why this can be disabled: On a corporate network, Windows Media Player doesn’t have nearly the place it might have on a home network. Disabling this service will have no impact on business activities.

10: Fax

Windows description: Enables you to send and receive faxes, utilizing fax resources available on this computer or on the network.
Why this can be disabled: If your organization is not using a network-based faxing service, disabling this service will have no business impact.

11: HomeGroup Listener

Windows description: Makes local computer changes associated with configuration and maintenance of the homegroup-joined computer. If this service is stopped or disabled, your computer will not work properly in a homegroup and your homegroup might not work properly. It is recommended that you keep this service running.
Why this can be disabled: It’s highly unlikely that a business organization — except a very small one — is using HomeGroups as a way to share resources on a network. It’s almost always safe to disable this service in a business setting.

12: HomeGroup Provider

Windows description: Performs networking tasks associated with configuration and maintenance of homegroups. If this service is stopped or disabled, your computer will be unable to detect other homegroups and your homegroup might not work properly. It is recommended that you keep this service running.
Why this can be disabled: As noted above: Only very small organizations are likely to use HomeGroups to share resources on a network, so it’s almost always safe to disable this service in a business setting.

13: Tablet PC Input Service

Windows description: Enables Tablet PC pen and ink functionality.
Why this can be disabled: The vast majority of PCs that are deployed to users do not have hardware that can leverage tablet-like capability. This service simply uses system resources with no possible benefit.

Monday, 18 March 2013

Remove a Virus From a USB Stick

How To: Remove a Virus From a USB Stick

Written by vidhubalu N on Mar 18th, 2013.

How To: Remove a Virus From a USB Stick

The easiest way to remove any virus from a USB stick is this: format it!  Be sure to use the Full Format function, not the quick format function.In the very unlikely event you get an error messages saying you cannot format the drive because it’s being used by another program, or for some reason you have data on there you don’t want to format off, then you can try the following.
Before I start however, let me explain the fundamental concept of what we are trying to do.
With most virus’ they make it very hard to delete the files so they can spread their infection.  To do this, they use several files and ping each other so they appear to be in constant use.  This is why you see the error “being used by another program cannot delete or format.”  So what we need to do, is stop that process.  In addition, programmers put in attributes to make it hard to delete as well.  For example they set the file attribute to Archive, or System File so we’ll need to remove those attributes too.
So lets start:  In Windows go to START > RUN.  In the field type cmd
This will open the DOS command prompt.  Here you should be at the C drive root.  If not type cd\ and click return.  You will then be at the C:\ root.
USB root
Next type the drive letter of your flash drive.  In my example that is drive letter F.  You can find the drive letter of your flash drive by going to START > MY COMPUTER > and look for the “Removable Disk“Next, type the drive letter, so for me, type f: and hit enter.
After you are in the drive letter of the flash drive, type dir/w/a
This will list all the files in your flash drive, regardless of it’s attributes of being hidden, System file or archive.
Now we should look for suspicious files such as anything listed as a .exe file or a .inf file.  Specifically anything with a autorun.inf should be deleted.  Some other popular ones are Ravmon.exe, svchost.exe, Heap41a and pagefile.pif.
If you see any of these, then lets remove all the file attributes and try and delet them.
To remove all attributes do the following:
In the DOS command prompt type attrib -r -a -s -h *.*  This command will remove all attributes for all files.
Now we can delete the files.  You do this by typing del filename [be sure to include the exentions too, for example type del autorun.inf and hit enter.
This should do the trick if you’d like to remove problem files without running the Full Format function.

Make your own USB OTG cable for an Android smartphone

Make your own USB OTG cable for an Android smartphone

Some high-end Android phones and most of today’s Android tablets support USB OTG (On-The-Go). This enables users to connect a standard USB input

Some high-end Android phones and most of today’s Android tablets support USB OTG (On-The-Go). This enables users to connect standard USB input devices such as keyboards and mice, or even extend storage using a regular USB pen drive. However, only a few Android tablets are equipped with a USB host port (Type A Female connector), while no mobile phone is. Some mobile phone manufacturers ship USB host ports with their handsets while others have them as optional accessories, usually at a premium price.

In order to connect an Android phone to a standard USB device, you need to use a micro (or mini) USB to USB Type A Female convertor, but this should also be an OTG cable. A mini USB OTG cable is available in the market and can cost you around Rs.150 – Rs.300, but finding vendors who actually sell it is not easy. The ones that are available are not guaranteed to work. The case of the micro USB OTG cables is also similar.

USB connector types
USB connector types


In this workshop, we show you how you can build yourself an OTG cable (be it micro or mini) at almost no cost. Do note that the procedure mentioned here will involve hacking into your existing cable, and even a small blunder can potentially damage your cable or the device you use it with. Proceed with extreme caution as we take no responsibility for any damages to your device. Do this at your own risk. Furthermore, do take note of your Android specs and check carefully to see if it has OTG capabilities before trying out this workshop. Phones don’t need to be rooted as the stock ROM usually supports OTG in compatible handsets. Those who have installed third-party developer ROMs should check with the developers if the OTG feature is enabled in the kernel.
Slicing the connector sleeve


Since all phones usually ship with cables, we suggest you opt for a second one from the market to create the OTG cable. For those who are not able to find a similar cable, this workshop will also show you how you can use the same cable for regular and OTG modes. In the following procedure, we'll be using a micro USB cable that we’ll convert to be used with USB OTG.

Requirements:
  • A standard mini or micro USB cable
  • Some small, thin wires
  • A sharp knife
  • Soldering iron and solder wire
  • Wire cutter
  • Hot glue or any quick glue

Firstly, we need to slice open the micro USB connector end very carefully using a knife. The idea here is to cut the outer sleeve (length-wise) into two halves to reveal the connector inside. Be careful not to destroy the outer sleeve as we shall be glueing it back on after the work is done.
A miniature switch
A miniature switch


After the sleeve is taken apart, some of you might find a whitish plastic mould covering the connector’s leads. This is for strengthening the cable to connector contacts, and its use depends from manufacturer to manufacturer. Those who have this mould will also have to cut through it to reveal the connector leads. On revealing the connector leads, you will find that it has five leads and not four. The usual four are power, data, data and ground, while the non-connected lead is sense. This lead needs to be grounded before connecting the cable for the phone to switch to OTG mode and sense a USB device connected to the interface.
The difference - circuit


Given above is the pin-out diagram for the micro and mini USB connector.
Pin 1: VCC
Pin 2: data
Pin 3: data
Pin 4 Not connected / unused
Pin 5: ground

In order to get the phone to go into OTG mode, we need to short Pins 4 and 5. You can either choose to short them permanently by soldering them together or soldering two wires to each of the pins and leading those outwards from the connector, which can then be soldered to a small switch. Using the switch, we can switch the cable between normal and OTG whenever needed. If you choose to short it permanently, you will have to cut off the connector at the other end (The Type A Male USB connector) and solder a Type B Female connector to accommodate a USB device. You can also choose to have a male to female USB convertor at that end. Here's what we did:
The connector and the sleeve


We chose to connect a small switch to the leads at Pin 4 and Pin 5 and glue the switch to the wire itself. This way, we could use the cable for both regular and OTG purposes. Next, we glued the connector sleeves back carefully using hot glue. Now the other end of the cable, which has a male USB connector, needed to be converted into a female. For this, we opted for the scrapped USB rear panel connector of a desktop PC. We soldered the wires of the USB connector to create a USB female-to-female convertor. Once done, we now have an OTG cable ready for use. Just to ensure we do not end up frying our phone, we used a multimeter to double-check any cable shortings during the soldering. Lastly, we connected the OTG cable to our Android (the Sony Ericsson Live with Walkman) and used a USB mouse with it. If your cable worked for you and your phone is compatible with OTG features, you can also connect a USB hub to the OTG cable and use a USB keyboard, mouse and pen drive together on the same Android device.
Micro USB Pin points


By following this workshop you can now conveniently use a pointing device to control your apps and games, use a keyboard to type e-mails and messages or use a pen drive to store or access media or large files. If you are lucky enough to find a micro USB connector and a Type A Female USB connector at an electronics store though, you can make your own OTG cable for under Rs.100.


Disclaimer
We've thought very carefully about the advice given above. And while we can state, categorically, that all effort has been made to ensure that it is reasonably sound advice, we cannot guarantee that your problem will be solved. Tech2 does not warrant or make any representations as to the accuracy, usefulness or completeness of the prices, data, recommendations, advice, and any other information.

Tech2 disclaims all responsibility and all liability for all expenses, losses, damages, loss of face, costs, or anything worse that you might incur as a result of the information on this page, or any linked website.

Do not attempt to troubleshoot, repair, or modify any device without understanding and following all of the relevant safety guidelines! Do also please keep in mind that repairing a product on your own while it is under warranty, will automatically nullify the warranty provided by the company. 

Android smartphone-usb-Pinout-Details

Android smartphone-usb-Pinout-Details


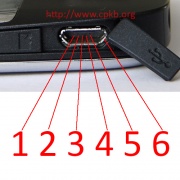
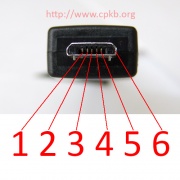
Micro-USB pinout
Micro-USB pinout
Pinout of Micro-USB data cables.

Also known as

  • microusb cable pinout
  • micro usb connector pin-out

Notes

  • For micro-USB headset pinout go to micro-USB headset pinout wiki page
  • Pin 2 when present is labeled "ID", and is used to determine the intial host device in USB On-The-Go.

Compatibility

Compatible mobile phones:
All mobile phones with micro-USB connector

Compatible micro USB accessories:

Legend

Please note: These pin numbers, while consistent with the images shown on this page, are opposite to the pin numbering in the original micro-usb spec, i.e. Pin 1 shown here would be Pin 5 in the USB spec, and vice versa. (The legend of the pinout is correct here!)
  • 1 - (black) GND / ground
  • 2 - (varies) ID
  • 3 - (green) Data +
  • 4 - (white) Data -
  • 5 - (red) VDC / plus / +5V
  • 6 - Shield